Depth gauge reading help
Moderator: Titelines

Depth gauge reading help
#1I have two el cheapo dial indicators. One has a Starrett 60* tip, and base and cal block by Larry Swearingen and the other a Golden Witch tip and base and cal block made by Dave Leclaire. The Swearingen block is stamped 0.094" and the Leclaire is stamped 0.108". I am putting the depth gauge setup on the cal block and zeroing them. The gauge set using the 0.094 block is reading 0.038" at the first station (closed,small end) of the tip side of my Blauvelt forms. The gauge set on the 0.108" is reading 0.019" at the same station. If I zero both gauges on the same calibration block they read either 0.019" or 0.038" on the same spot on the form, depending on which cal block I use. What's going on here? I know this is supposed to be simple, but I want to know I am doing this right.
Last edited by canetuck on 05/16/15 16:07, edited 3 times in total.
Re: Depth gauge reading help
#2I have to say that I am a tad confused after your post but here it goes. Use the Leclair calibration block and slide the dial gauge in the holder until it reads .108" on the red numbers on the inside the dial, ignore the black numbers. Lock the set screw. If you do this then use your Swearingen block and it should read .094" on the red numbers, this proves that the gauge is reading correctly.
The .100 value is read on the little dial and the .008"value is read on the actual main dial, so it should read 8 ticks to the left of zero!
I hope this clears it up, off to dinner, I will see how you did upon my return.
The .100 value is read on the little dial and the .008"value is read on the actual main dial, so it should read 8 ticks to the left of zero!
I hope this clears it up, off to dinner, I will see how you did upon my return.
Visit me at the Canebuilder channel on YouTube
See about our gathering in 2017 www.canadiancane.com
Everything I know I have learned from others....................
See about our gathering in 2017 www.canadiancane.com
Everything I know I have learned from others....................
Re: Depth gauge reading help
#3Jimmy, does it matter where the dial is turned before putting the point in he block? I thought you set the gauge all the way down on the block and lined 0 up with the indicator hand and then locked it down. So slide the indicator in the block until it reads .108" and turn the dial so the 0 lines up with indicator and then lock down?
Re: Depth gauge reading help
#4It should work like this. Place your indicator point into the calibration standard. Adjust the dial until the indicator pointer is aligned with the reading stamped on the calibration standard (either 0.94 or 0.108). If your indicator reads 0"-1.00", use the inside dial numbers--usually red. This is the case for most indicators.
Galt
Galt
Know the reasons for your actions
Re: Depth gauge reading help
#5Back from dinner, chicken stir fry with soft Asian noodles.
What Galt said is correct. Those calibration devices tell you what the reading should be on the dial when the device is nesting in the cal. device. So as I said, set the dial to .108 then check it with the .094 unit. The readings on the dial need to match the numbers on the calibration devices.
You need to use the scale that runs counter clockwise which on a basic indicator is typically the red numbers on the inner scale not the "main" black numbers that run clockwise.
Now this is NOT accurate, but after you set the indicator, carefully place the indicator and base on a flat surface and it should be around zero, it will never be dead on but this is the common sense test. Logically the top of your forms is 0.00" and you are counting down which is counter clockwise.
For beginners this is confusing and for that reason a more expensive indicator that reads only CCW is much easier to use or a digital indicator eliminates confusion as well. I think I will post some pics for you in a bit after I get settled.
Hope this clears it up somewhat for you
Visit me at the Canebuilder channel on YouTube
See about our gathering in 2017 www.canadiancane.com
Everything I know I have learned from others....................
See about our gathering in 2017 www.canadiancane.com
Everything I know I have learned from others....................
Re: Depth gauge reading help
#6You said
"Jimmy, does it matter where the dial is turned before putting the point in he block? I thought you set the gauge all the way down on the block and lined 0 up with the indicator hand and then locked it down. So slide the indicator in the block until it reads .108" and turn the dial so the 0 lines up with indicator and then lock down?
No, that is incorrect, see above. The zero should be at 12:00 o'clock.
Re: Depth gauge reading help
#7A picture is worth a thousand words, or so they say.
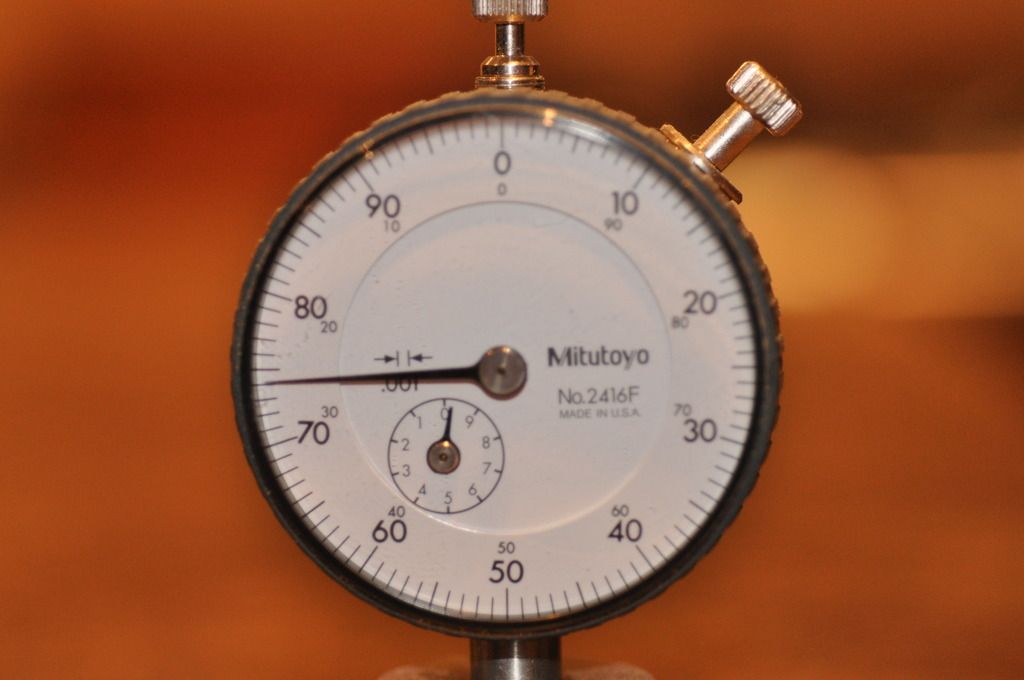
Fig 1
Figure 1 is a standard dial indicator. The large number scale increases in a clockwise direction . The smaller number scale increases in a counter clockwise direction (CCW) This smaller scale (CCW) is the one you need to use for planing form settings. The setting on this example is random and has no bearing on this explanation.
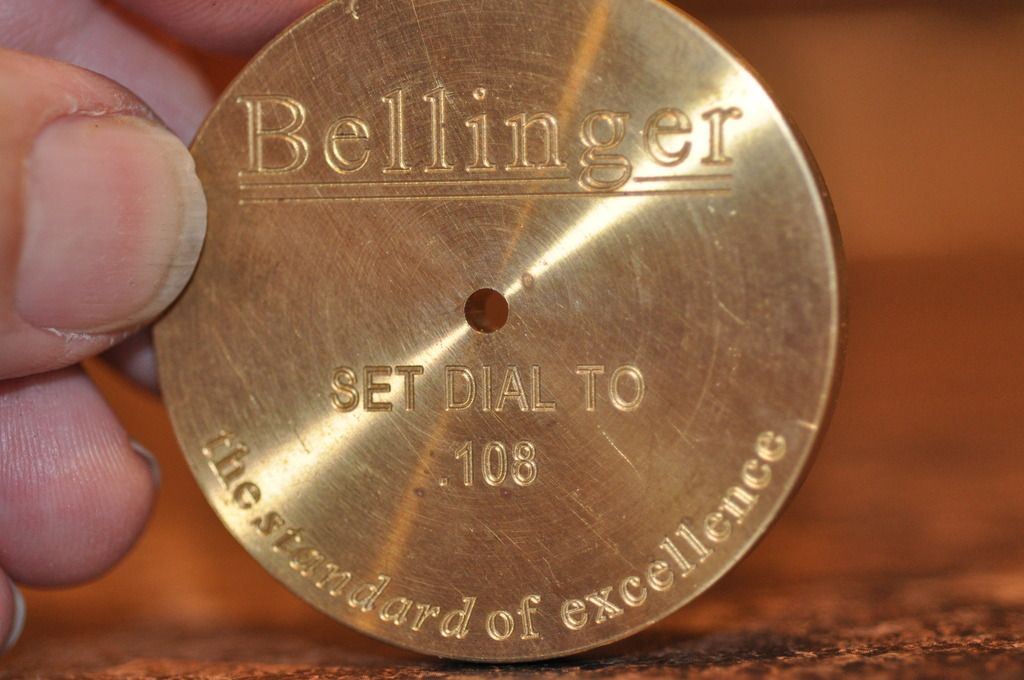
Fig 2
Figure 2 shows a Bellinger precision setting standard with .108". This what I use and I think it is an excellent tool.

Fig 3
Figure 3 shows a Mitutoyo indicator model 2904S. This indicator has only one scale which reads counter clockwise and is the easiest indicator to use for setting planing forms. Note that with the indicator placed on the standard it reads .008" on the main scale and .100" on the little scale in the bottom left od the indicator. This is now set to .108" and ready to set forms.
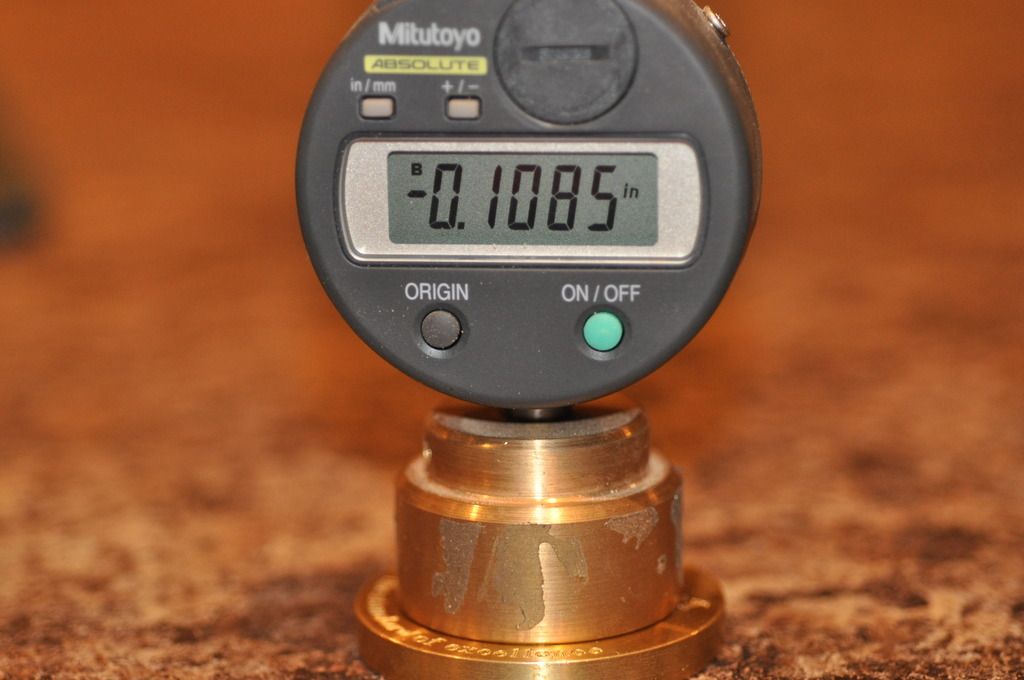
Fig 4
Figure 4 shows another good option, a Mituyoyo digital indicator that is very easy to read and use. Note that it is off by.0005" which is probably some debris on the standard or on the base but also .0005" is a very small error as it relates to final dimensions of a bamboo strip.
Contact canebuilder@gmail.com if you have additional questions.
Fig 1
Figure 1 is a standard dial indicator. The large number scale increases in a clockwise direction . The smaller number scale increases in a counter clockwise direction (CCW) This smaller scale (CCW) is the one you need to use for planing form settings. The setting on this example is random and has no bearing on this explanation.
Fig 2
Figure 2 shows a Bellinger precision setting standard with .108". This what I use and I think it is an excellent tool.
Fig 3
Figure 3 shows a Mitutoyo indicator model 2904S. This indicator has only one scale which reads counter clockwise and is the easiest indicator to use for setting planing forms. Note that with the indicator placed on the standard it reads .008" on the main scale and .100" on the little scale in the bottom left od the indicator. This is now set to .108" and ready to set forms.
Fig 4
Figure 4 shows another good option, a Mituyoyo digital indicator that is very easy to read and use. Note that it is off by.0005" which is probably some debris on the standard or on the base but also .0005" is a very small error as it relates to final dimensions of a bamboo strip.
Contact canebuilder@gmail.com if you have additional questions.
Visit me at the Canebuilder channel on YouTube
See about our gathering in 2017 www.canadiancane.com
Everything I know I have learned from others....................
See about our gathering in 2017 www.canadiancane.com
Everything I know I have learned from others....................
-
thegubster

- Bamboo Fanatic
- Posts: 4658
- Joined: 08/29/05 18:00
- Location: Minnesota!
Re: Depth gauge reading help
#8Very nice job Jimmy. Nice explanation too Galt.
Newby's appreciate the help.
Newby's appreciate the help.
Re: Depth gauge reading help
#9Thanks fellows for your time and effort. I am going to figure this out.
-
OldCane

- Bamboo Fanatic
- Posts: 1184
- Joined: 07/30/13 07:16
- Location: Near the Hudson, north of Fishkill Creek
Re: Depth gauge reading help
#11I think what is confusing you is that you are moving the dial indicator up or down in it's housing to make it read the number on your standard block and then locking the dial indicator in place and leaving that adjustment alone. The calibration block is a calibrated depth hole with 60 deg sides to match your 60 deg tip and the point doesn't touch bottom so you set the dial to zero on the top and then move the whole unit until the dial reads the correct depth. After that it should be calibrated to zero with the tip's point resting at the top of your forms. But in real life the 60 deg tip is not accurate in measuring on it's point (blunt tip) and needs to measure based upon the 60 deg sides to give a true reading hence the need for the calibration block.
I don't have a PhD, but I do have a DD214.
Re: Depth gauge reading help
#12Can you explain me please the importance of .108"? What does it mean that Bellinger has it as a preset? Sorry, I don't get it.
Re: Depth gauge reading help
#13The hole is the exact width needed to give a reading of .108" on a properly calibrated depth gauge using a 60° point. The rest is trigonometry.
Re: Depth gauge reading help
#14Let me try. Set the indicator on the Bellinger brass disc. Rotate the bezel ring to read .008”. The smaller dial should read slightly beyond the 1 (.100). Your dial indicator is calibrated now. It reads the correct measurement on a known point (the Bellinger brass disc).peteraxx wrote:Can you explain me please the importance of .108"? What does it mean that Bellinger has it as a preset? Sorry, I don't get it.
Set your form.
Sent from my iPhone using Tapatalk
-
henkverhaar

- Bamboo Fanatic
- Posts: 1260
- Joined: 07/02/16 15:37
- Location: Near the Geul...
Re: Depth gauge reading help
#15As far as I'm aware, the 0.108 has no 'special, magical' importance. It's just a convenient size to calibrate a depth gauge.
The standard 60 degree point has a certain size (I think it is about 4mm wide at its widest point, where it attaches to the stem of the gauge - 4mm is about 0.16 inch). In order to accurately calibrate the gauge with this method, the (accurately sized) hole needs to be as large as possible while still being smaller than the base width of the point.
The hole is 0.125 inch, which is a convenient drill size that is still comfortably smaller than the maximum width of the point.
Trigonometry then will tell you that the (form) depth associated with gauging that hole with a 60 degree point is 0.108". That's all there is to it.
Note that you can in principle do the same trick with a set of calipers. set the jaws to a convenient size (I normally use 3 mm) and lock them. Set your depth gauge on the flat part of the jaws so that the point rests between the open jaws. A 'hole size' of 3mm corresponds to a depth of 2.60mm, so your depth gauge should read (be calibrated to read) 2.60mm (actually 2.598).
-
trouttrapper
- Guide
- Posts: 118
- Joined: 08/23/08 18:00
Re: Depth gauge reading help
#16I make standards that set the depth gauge to read .100". To do so the hole diameter must be .1155".
-
henkverhaar
- Bamboo Fanatic
- Posts: 1260
- Joined: 07/02/16 15:37
- Location: Near the Geul...
Re: Depth gauge reading help
#17Works - if you can make an accurate hole at that size - and it makes using the depth gauge a little easier ;-)
Re: Depth gauge reading help
#18Hi Guys, I don't use a 'standard.' I set the tip onto the flat top of the form and 'zero' it. Then I start setting the form.
Jay Edwards
Jay Edwards
-
SpringCreek

- Bamboo Fanatic
- Posts: 3211
- Joined: 02/24/07 19:00
- Location: Wildwood, MO
- Contact:
Re: Depth gauge reading help
#19Back when I did a lot of hand planing I had several standards that I had accumulated over time. In total I think I had five of various depths and one that i could zero a digital depth gauge with. All of them gave different measurements. Most were close, but never the same. In the end I think a standard gets you close. Time and experimentation will let you know what form adjustments you need to make to get you to your final measurements.
Then as it was, then again it will be. Though the course may change sometimes, rivers always reach the sea. - Led Zeppelin, 10 Years Gone
http://www.splittingcane.com
http://www.splittingcane.com
-
Anders Johannesson
- Sport
- Posts: 69
- Joined: 06/30/16 12:50
- Location: Sweden, Åmål
Re: Depth gauge reading help
#20It can be a help to make an arrow on glass of the dial to easier see in which direction it goes to not mix it up.
My indicator tip is 60 degree, but the tip I have cutted off so the tip is flat.
From my point of view it's better to skip the calibration tools. Instead you can do it the other way and plane a strip.The choice of dimension is yours. It doesn't needs to be tapered strip for a joint. Measure the bamboo after planing and adjust the indicator to what's coming out of your planing form.