I have Bellinger swelled butt 6' planning forms, jd Wagner binder and an 8' Pacific Bay power wrapper & dryer and my crammed 500' workshop only has room for one 8'x2' work bench.
I was going to seat the planning form on the front with wood strips holding it in solid then build a platform to go over the top of that to another 8' strip I can set the wrapper and dryer. Has anyone here done something similar?
I have built out 6 other work benches for my shop so the construction I have down like I want. All of my benches are big, bulky and solid with retractable wheels. My concern is that the forms will be at 36" height and planning will be awful because I have to bend to much (belly button 41") and if I build a platform to go over wrapper\dryer instead then it will be too big and bulky to easily move out of the way and be too high.
Have also toyed with the idea of a slide out for planning forms but that would make them another 4" lower. I could I guess just store the planning forms on a shelf below.
Would appreciate input and/or pictures.
all in one bench
Moderator: Titelines
Re: all in one bench
#2Hi Guys, Planing is soooo important that I'd figure out what is perfect for you doing that, and then work from there.
Jay Edwards
Jay Edwards
-
canerodscom

- Bamboo Fanatic
- Posts: 2865
- Joined: 02/01/04 19:00
all in one bench
#3It’s easy to make risers for planing forms from scrap pieces of 2x4 and rubber drawer liner / router pad. I use two 8” lengths of 2x4 stacked and screwed together then covered with the pads. One riser about a foot from each end is a huge help when planing and can be added to for additional height.
Sent from my iPhone using Tapatalk
Sent from my iPhone using Tapatalk
Re: all in one bench
#4do you set all of that up when planing and then put it away when moving on to the rest of the build?canerodscom wrote: ↑12/28/21 00:35It’s easy to make risers for planing forms from scrap pieces of 2x4 and rubber drawer liner / router pad. I use two 8” lengths of 2x4 stacked and screwed together then covered with the pads. One riser about a foot from each end is a huge help when planing and can be added to for additional height.
Sent from my iPhone using Tapatalk
-
jim royston
- Bamboo Fanatic
- Posts: 1291
- Joined: 08/20/08 18:00
Re: all in one bench
#5When I built this bench 12 years ago, my first requirement was comfortable planing, which I got by simply measuring my elbow height from the floor. The bench top is about 4” below that. I hang my forms as shown. The lip of the bench top allows me to this attach the bench dog, from scrap delrin, drilled and tapped ( that stuff taps beautifully). This setup really works well for me.

-
Tom Smithwick

- Master Guide
- Posts: 755
- Joined: 10/27/03 19:00
Re: all in one bench
#6If you can fit such a thing into your scheme. this is what I have used for years. This set up is in my new shop, which is very spacious, so the actual bench just sits where it is all the time, and the forms and the riser/clamp rig can lean against a wall out of the way when not in use. The riser/clamp was set up in my old shop, where I had similar space issues to your shop, and a lower than desirable work bench when planing. It saves a lot of stress on the back to have the forms at a higher elevation. The clamps can be moved, but when I set the rig up I put them 18" apart and never saw fit to move them. The 1st clamp holds the strip near the butt end, the other clamp allows you to plane backwards forward the butt to clean up the end of the strip that can't be accessed when clamp 1 is being used. The clamps take a lot of the work out of finish planing.

-
canerodscom
- Bamboo Fanatic
- Posts: 2865
- Joined: 02/01/04 19:00
Re: all in one bench
#7Yes. It only takes a minute or two to stand the planing forms in the corner and put away the risers. My entire sho is just 320 sq. ft. so I’m accustomed to using tools and putting them away then getting out the next tools to be used.scwhite wrote:do you set all of that up when planing and then put it away when moving on to the rest of the build?canerodscom wrote: ↑12/28/21 00:35It’s easy to make risers for planing forms from scrap pieces of 2x4 and rubber drawer liner / router pad. I use two 8” lengths of 2x4 stacked and screwed together then covered with the pads. One riser about a foot from each end is a huge help when planing and can be added to for additional height.
Sent from my iPhone using Tapatalk
Harry
Sent from my iPhone using Tapatalk
Re: all in one bench
#8hey you guys are great! I got it now. I am really going to do a little of everyone's input and then use clamps until I know exactly where I like everything. Will post a pic of the finished bench next week for the archives and to get some feedback. I actually am going to have an 8x8 square area to work in as I keep all the shop tools along the outer parameter and one empty 6x2 moveable bench in the center and this will stay in that pattern. I though my last addition was the last workstation I could fit in but I think this will work.
Re: all in one bench
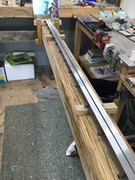
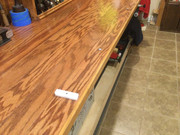
#9Here is what I do FWIW. I screwed together two 2x4s with a block on the end that provides a lip. I also drove some studs that you can see into each side of the top board to keep the form from sliding off although I have taken to clamping both ends down lately. Anyway, you can slide the board back and forth on the bench to get it out of the way when not in use. I also use the same setup for my MHM anvils which are in the background there. The working surface of the form set up this way is 38". Hope this helps.
Don.

Don.
Don Titterington
Desert Canyon Rods
West Linn, OR
Repairs/Renovations
Custom Builds
Desert Canyon Rods
West Linn, OR
Repairs/Renovations
Custom Builds
Re: all in one bench
#10Thanks Don, it does!
Working on dust shield now. My studio is pottery, wood and rods so in addition to pushing this to one better set up bench I am now working on how I am going to screen this area from all wood and clay dust. Draping plastic has been meh, I work really hard on capturing dust but hand sanding and table saw just gets everywhere so the rod bench needs to be behind a protective shield when not in use that is more effective than draping plastic.
Working on dust shield now. My studio is pottery, wood and rods so in addition to pushing this to one better set up bench I am now working on how I am going to screen this area from all wood and clay dust. Draping plastic has been meh, I work really hard on capturing dust but hand sanding and table saw just gets everywhere so the rod bench needs to be behind a protective shield when not in use that is more effective than draping plastic.
Re: all in one bench
#11i am a newbie, but this what i did . Japanese planing beam . 9' engineered 6" x 6" slightly sloped towards my bench . "A" frame made from the bed slats that held my bed up when i was a kid . 1 " x 1' x 6" blocks to set the form on . rubber mat on top ,60 grit on the bottom of the blocks .bridle made of wht.oak , made a bit larger than the beam and held in place by a wedge tapped in place on the bottom . it can slide the length of the beam or be removed entirely . hold down on the bridle . very sturdy set-up ,no wobble or shake . make it whatever height suits your fancy . take it down when you're done .